Every year on 12 December, Geneva holds a festival called l’Escalade, celebrating the defeat of an attempted invasion in 1602. A celebrated part of the victory was when a cook dumped a pot of boiling soup on the invaders. This act has become part of the annual tradition of l’Escalade with the sale of chocolate marmite de l’Escalade – chocolate pots filled with marzipan vegetables.
While I grew up in Australia, my mother’s family is from Geneva. When my trips to Geneva coincided with l’Escalade, I loved the celebration and the marmite. In truth it is probably mostly because of the chocolate, but the tradition is also important. Many years later, when I had young children, I wanted them to be able to celebrate l’Escalade with a marmite. I was not able to find a place in Australia that made them. I also was unable to find somewhere in Geneva that would ship them to Australia (although my poor French no doubt hampered this). One year my uncle very generously sent me a marmite. Unfortunately it appears marmites do not travel internationally very well. How could I make one myself?
Using a 3d printer to make a marmite
In early 2025 I decided to see if I could use my 3d printer to help with making a marmite. I think I have achieved a somewhat cromulent marmite, although it is far less elaborate than the ones sold in Geneva. This article goes through the steps I followed to make a marmite.
Essentially, I used my 3d printer to make a mould for food-safe silicone, which in turn I used to hold the chocolate. I made 3 moulds – a mould for the pot, a mould for the lid, and a mould for the 3 legs.
Main pot mould
The main pot mould was the most complicated as it curves in on itself. It is constructed in four or five parts – the main outer mould is split into three identical parts, so they can be separated once the silicone is set. These parts have little stabilising spokes poking in. These are to hold the inner mould in place, so it is not displaced when you pour in the silicone.
The inner mould is essentially the shape and the size of the walls of the Marmite. It is there to make a negative for the silicone to fill around. It does not have to be very sturdy, as it really only needs to be used once, and there should be relatively limited stress on it.
Finally I printed a simple band to hold the 3 parts of the mould together. This needs to be strong but slightly flexible. I ended up using Bambu’s TPU for AMS, but it could probably be PETG or possibly even PLA in a pinch.
When these parts are constructed together, they should be snug, and not have much or any movement. you may want to add some masking tape around the inside or outside of the mould to stop the silicone leaking out. Once that is done, you are ready to add the silicone.
I used SiliCreate Liquid Silicone, which I got from eBay: https://www.ebay.com.au/itm/353033007580 It comes in two parts, it is food safe, and fairly easy to work with. There are no doubt other liquid silicones that are food safe and just as easy to work with.
I poured the silicone to just reach the top of the inner mould. Once the silicone is set (the silicone linked above takes about 8 hours to set), remove the outer mould. Trim off any excess silicone.
You will be left with slim holes in the silicone where the stabilising spokes held the inner mould in place while the silicon set. You can either leave these in place or fill them up with silicone (the intention is to always use the silicone mould supported by the outer filament mould). I decided to fill them with silicone – I made a bit more silicone and filled these. Due to the nature of gravity and fluids, it took a few goes to fill all of these in as it needed to be held at the right angle to stop the silicone pouring out. I also clipped off the inner stabilising spokes from the outer mould.
With this done, I cut the silicone mould in two, and removed the inner mould. This inner mould does not need to be used again. Put the two cut silicone parts back together, surround them by the 3 outer parts moulds and hold these together with the outer band. Now the main pot mould is ready to go!
Lid mould
The lid mould is much simpler. Ultimately it is just immersing the 3d printed lid in silicone until it sets.
The only real challenge was to find a container in which the lid could be immersed, without wasting too much silicone. I immersed it upside down so the flat part of the lid was at the surface of the silicone.
Legs
I designed the mould for the legs last, and it takes advantage of some of the things I learned with the other moulds. It comprises two parts, an outer shell:
And an inner shell:
The outer shell has holes in the bottom of where the feet go. This is to make removal of the mould and ultimately the chocolate much simpler. The inner shell has holes in the top, to allow pouring of the silicone and to allow excess silicone to escape.
Assemble the outer shell, insert the plugs in the bottom. They should be snug, and you may use masking tape to ensure the silicone does not escape. Put the inner shell into the outer shell. They should fit together snugly. If done correctly, there will be a small gap between the shells for the silicone. Gently pour the silicone through the holes in the top of the inner shell, ensuring that all parts of the mould are filled.
Once the silicone is set, remove any masking tape. I found that I could separate the outer filament moulds by pushing on the plugs in the outer mould. Once they are separated, you can dispose of the inner mould as it has done its duty.
Chocolatising and filling
With the moulds ready, it is time to get the chocolate ready. Depending on what you have in your kitchen, there are many different ways to melt chocolate. It is also really easy to burn it, so be careful. We have a Thermomix, which made it really easy – I set it to heat the chocolate to 50 degrees, which is just above the chocolate melding temperature. Some people have had good success melting chocolate in the microwave. I am sure there are websites out there that can give comprehensive advice.
For the main pot, with the silicone mould held together by the 3 outer parts, and the surrounding ring, I poured in the melted chocolate. I swirled the chocolate around, seeking to coat all of the internal parts of the pot. Once the chocolate is coating the internal parts of the mould , let the chocolate harden. Once it is hard pop it in the fridge so it is solid, and remove the silicone mould.
One problem I encountered with the design of the main pot mould is that I could not get the chocolate on the internal top lip without risking chocolate dripping out of the open hole. The next time I do this, I plan to insert the PLA model of the lid in the silicone mould to keep the chocolate inside.
The lid and the legs are a bit simpler – just pour it in the chocolate and wait for them to harden. removing the mould should be simpler.
To attach the legs to the pot, I melted the top of the legs slightly and stuck them on.
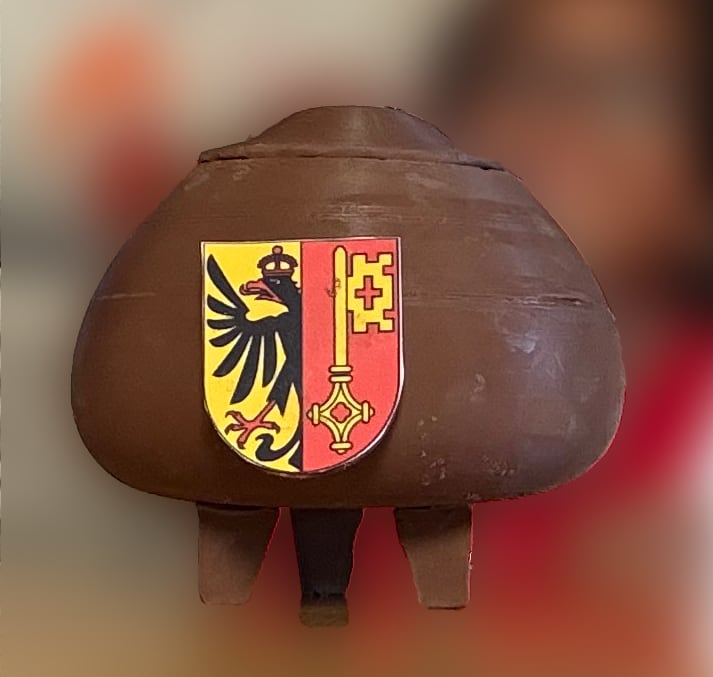
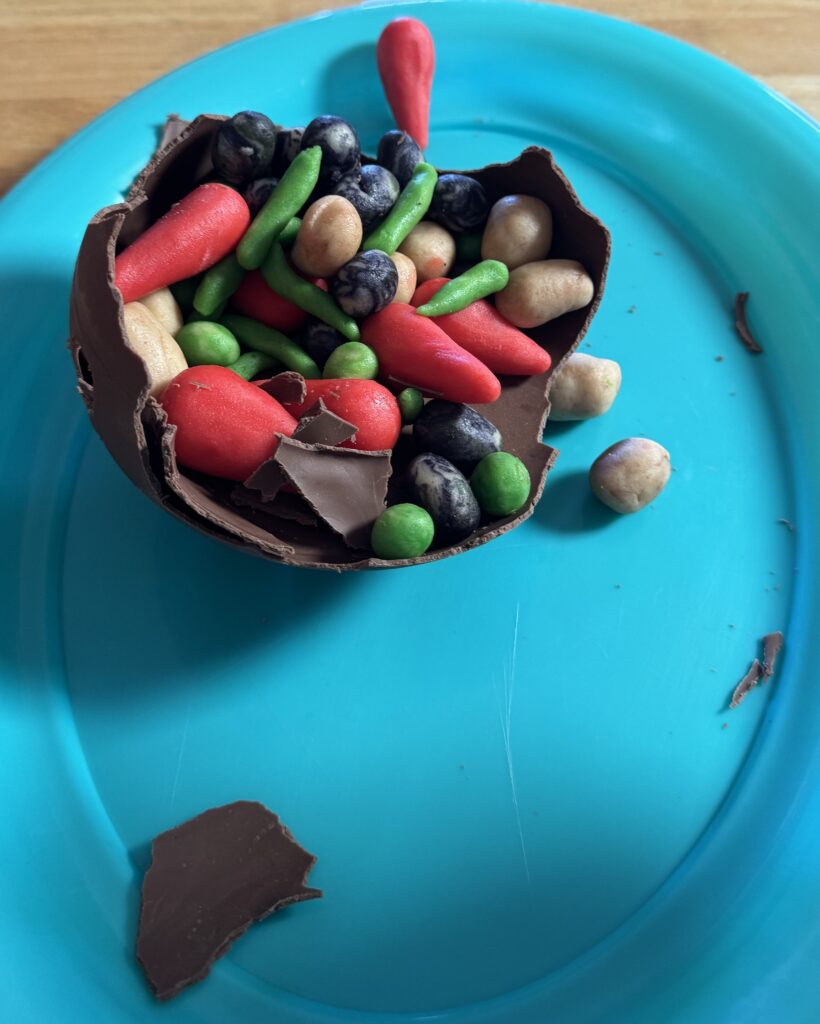
Photos of the completed marmite
Here are some photos of the completed and demolished marmite. I found a place online that prints images on edible paper. I had them print out a Geneva crest, which worked fairly well.
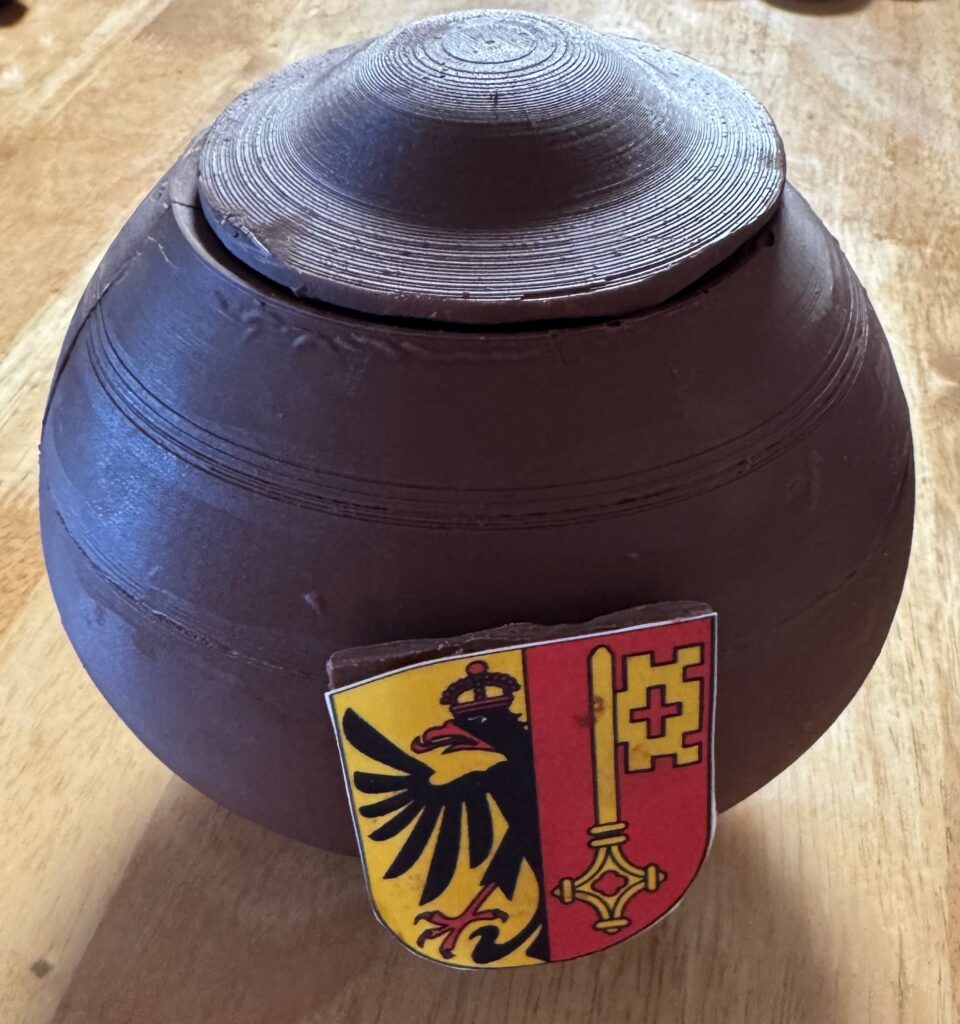
The layer lines are very visible in the first picture. They were visible in person, but I do not think they were as jarring at the first picture suggests. You can probably reduce the layer lines by printing smaller layers, and maybe lightly sanding down the PLA moulds.
I also made some marzipan vegetables, as it traditional for marmites. As anticipated, the kids had much less interest in the marzipan vegetables as the chocolate.
Anticipated questions
What filament did I use? I used PLA for all of the 3d printed parts. With a couple of possible exceptions, the 3d printed parts generally do not come in direct contact with the chocolate so it may not matter. But some 3d printed parts comes in contact with the same silicone that does contact chocolate. It seems that PLA and PETG are commonly recommended for food-safe printing. Also avoid brass nozzles as brass sometimes contains lead.
Any lessons / would I do it differently? The main thing I would do differently is to design the main pot mould differently. I would make the bottom of the outer mould flat so it could sit on a surface, and I would reduce the inner gap so the silicone mould is thinner. Alternatively, I have seen thin external moulds that are somewhat flexible. It may be possible to make the external mould in a single piece that can be held together easier.
How long does it take to make the mould and marmite? From start to finish, it would probably take about a week for all of the components to be printed, silicone moulds made, and chocolate marmite to be constructed. It probably takes 2-3 hours of active work – setting up the printing, mould making etc. Making the marzipan vegetables takes a bit longer. I did it very part time, and did a bunch of experimenting. I started looking at moulds in March or April, and did not finish making the marmite until early December.
What size did you print the marmite? I ended up printing the mould pieces at 1.5x the size of the 3d models. The martmite was about 17cm in diameter at its widest.
Any tips for working with silicone? The silicone I used occasionally left bubbles. With some of the later moulds I tried to agitate the silicone by gently shaking it with a multitool. It did not seem to work. The best approach is probably to avoid creating bubbles in the silicone when making it.